Automation
Automation moves a setting by itself: an LFO sways a look's scale, the bass pushes its brightness, the beat flips a switch, a random value gives every surface its own colour. You pick a source, and shape how the setting follows it in the Response block, with live pictures of the sound and the result.
1Sources and routes
- A source is something that changes over time: an LFO (a wave), the music, a ramp, a random value. One source can move many settings; change the source and they all follow.
- A route connects one source to one setting, with its own response: which part of the source counts, how far the setting moves, how fast, along which curve.
- The setting keeps its own value. A route moves it from where you set it, so dragging the slider still changes the look. Several routes on one setting add up.
2The sources
| Source | What it gives | Its settings |
|---|---|---|
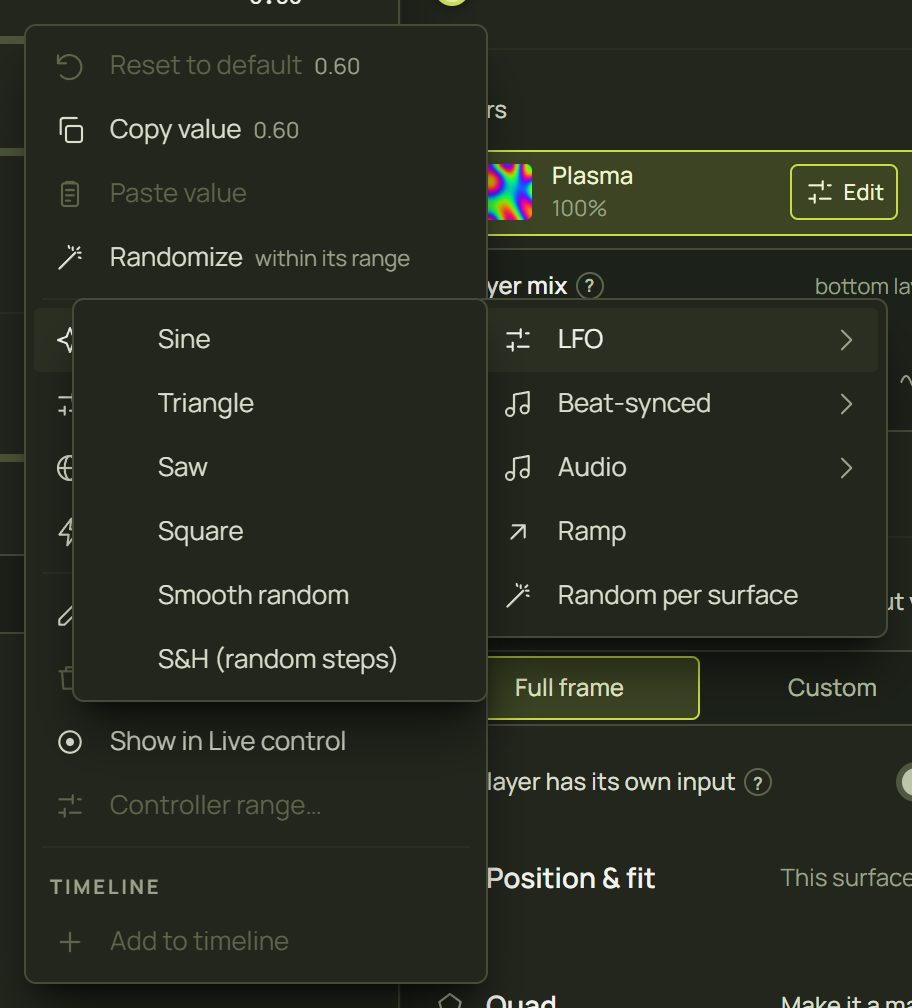
| LFO | A repeating wave from −1 to +1: Sine, Triangle, Saw, Square, Smooth random (glides to a new random value each cycle) or S&H (random steps). | Shape; Hz (0.01–10 Hz) or Beats (one cycle every ¼ beat … 8 bars, following the tempo); Phase, so two surfaces can move one after the other. |
| Beat-synced | An LFO locked to the tempo. Choices step to the next option and switches flip on each division. | ¼ beat, ½ beat, 1 beat, 2 beats, 1 bar, 2 bars, 4 bars, 8 bars |
| Audio | The music, from 0 to 1: Level, Bass, Mid, Treble, Brightness (how much high end), Frequency band 1–8 (40 Hz … 16 kHz), the hits Kick drum, Snare / clap, Hi-hat and Hits (onsets) (jump on each hit and fade), and from the tempo Beat pulse, Beat ramp (0 → 1 over each beat) and Bar ramp (over each bar). | What it follows. It needs a sound input: see Sound and tempo. |
| Ramp | Rises from −1 to +1 over its duration, then starts again (or holds). | Duration (0.5–120 s), Loop |
| Random per surface | A fixed random value for each surface, so one route gives every surface its own colour, size or phase. The Randomize trigger rolls new ones. | — |
3Add automation
There are three ways to start, and they all make the same kind of route.
The wave button
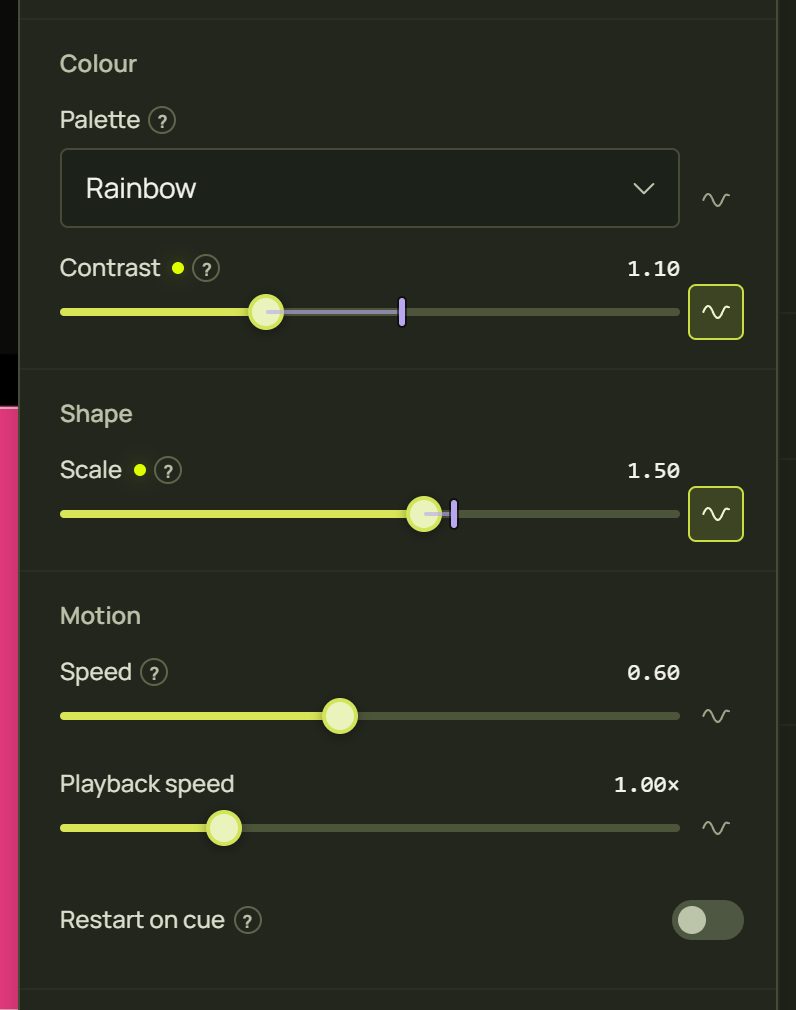
- Select a surface and open its look panel (E). Every setting that automation can move has a small wave button on its right (the layer's Layer opacity in the inspector has one too).
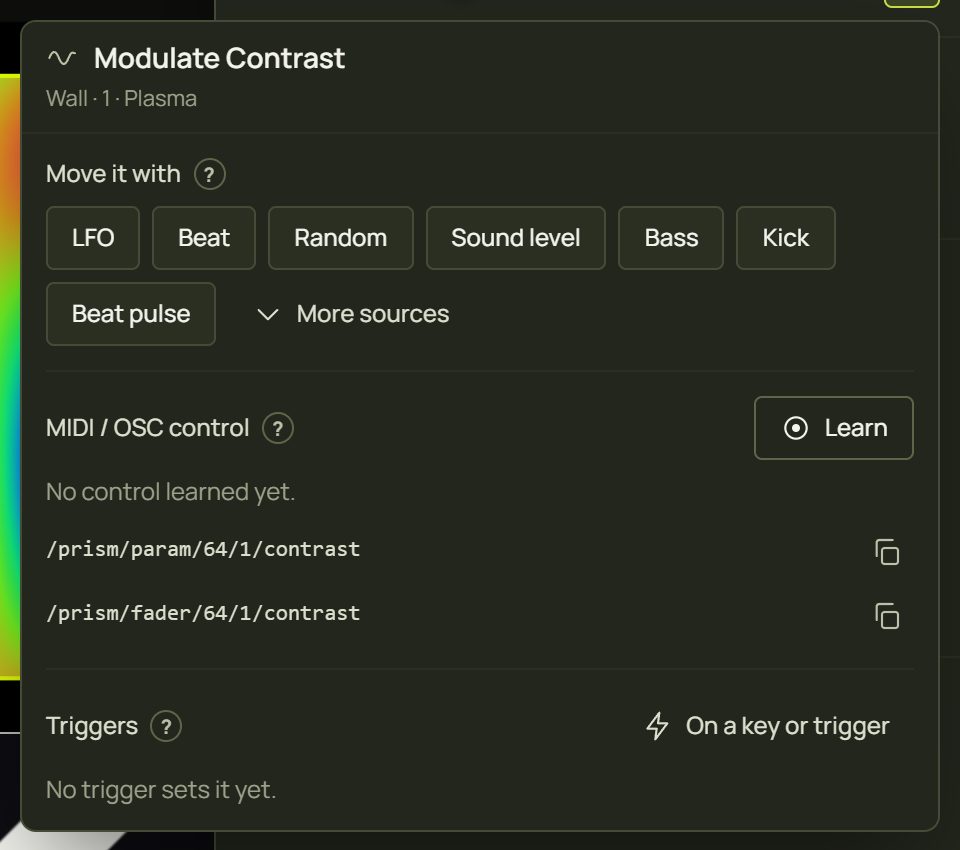
- Click it. The popover Modulate Setting opens, with the surface, layer and look under its title.
- Under Move it with, click a quick source: LFO (a slow sine, 0.25 Hz), Beat (one cycle per beat), Random (smooth random wandering), Sound level, Bass, Kick or Beat pulse. More sources has every other one, and Or a source you have reuses one.
- The route appears above, already moving. Shape it (next sections), then click outside or press Esc.
The right-click menu
Right-click any setting (or press and hold, or Shift + F10) ▸ Modulate ▸ LFO ▸ a shape, Beat-synced ▸ a division, Audio ▸ a feature, Ramp, Random per surface, or A source you have. When the setting is on screen, its popover opens on the new route.
Live control ▸ Automation
Add automation at the top of the Automation tab asks for the Surface, Layer, Setting and what it is Moved by. Useful for a surface you can't easily click.

4A route
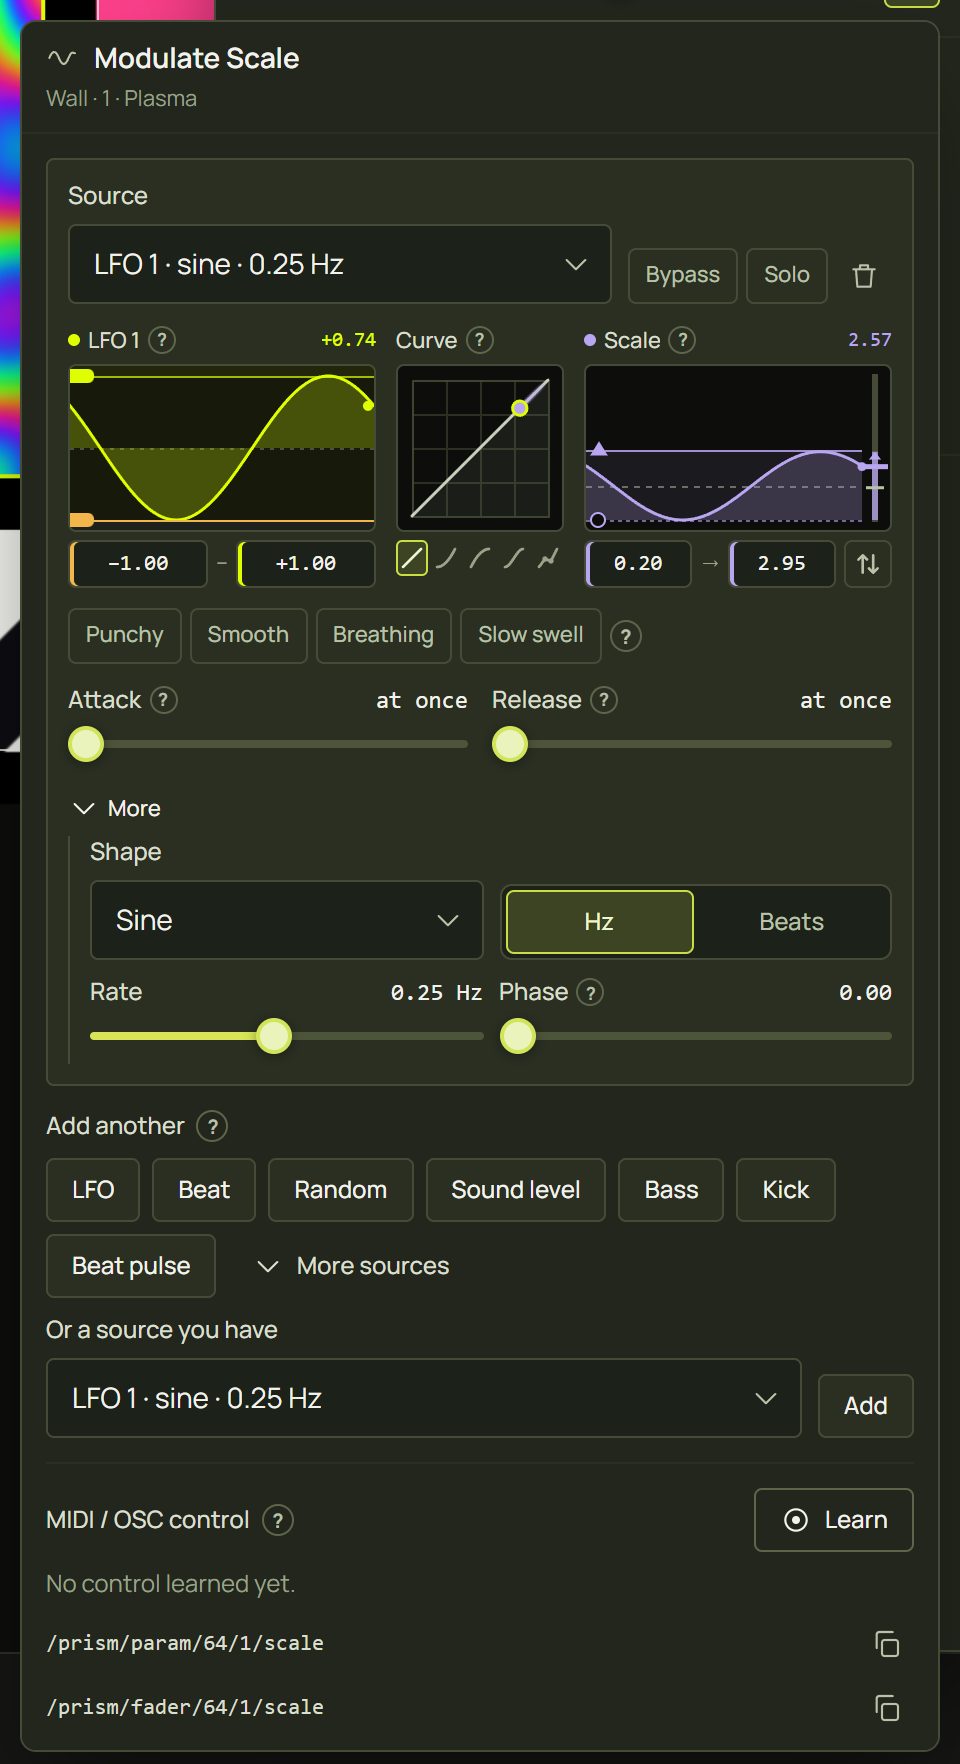
Each route is a card in the setting's popover:
- Listens to (a sound route: which part of the music) or Source (which LFO, ramp or random).
- Bypass keeps the route but lets it move nothing; Solo lets only this route move the setting; the bin removes it.
- The Response block: see the next section.
- More: the source's own settings (an LFO's shape, Hz or Beats, rate and phase; a ramp's duration and loop), or another source for a sound route. When a source is shared, it says how many routes use it: changing it changes them all.
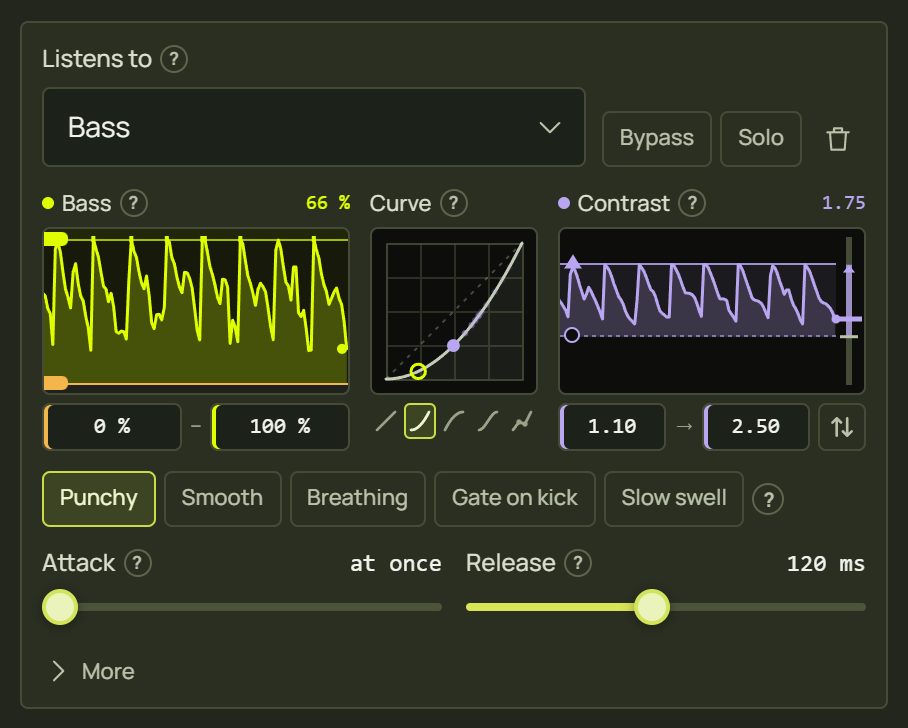
5The Response block
The Response block shapes how the setting follows its source, and draws it live so you can see what each change does. It works left to right:
| Part | What it does |
|---|---|
| Input range (left) | The source's last four seconds, with two handles. Below the amber handle counts as nothing (quiet parts are ignored); from the lime handle up counts as full. Only the lime part of the trace moves the setting; a narrower range reacts more. Drag inside the band to move both. |
| Curve (middle) | How the input becomes the output: Linear, Ease in (only the loud part moves it far), Ease out (quiet parts already do), S (mostly the middle) or Custom. The lime ring is the input now; the lavender dot follows it with the attack and release. |
| Output range (right) | Where the setting sits at the bottom of the input range (from, the circle) and where it goes at the top (to, the arrow), on the setting's own scale, for example Scale from 1.50 to 4.40, or the hue from +0° to +90°. The dashed line is the setting's own value; the line is the last four seconds with these settings. |
| Invert | Swaps from and to, so a loud sound lowers the setting instead. Dragging one handle past the other does the same. |
| Attack / Release | How fast the setting rises when the source goes up, and how fast it falls back: from “at once” to 5 s. Short attack: it jumps on each hit. Long release: it glides down. |
Presets set the attack, release and curve in one click (the output range stays):
| Preset | What it does |
|---|---|
| Punchy | Jumps at once on each hit and drops back quickly; only the loud part moves it far. |
| Smooth | Follows the music without flicker. |
| Breathing | Rises and falls slowly with the energy of the music, like breathing. |
| Gate on kick | Sound routes only: listens to the kick drum, lets only the strong hits through and flashes on each. |
| Slow swell | Builds up over a few seconds of loud music and fades out slowly. |
- Custom curves: pick Custom, then drag the points. Double-click the square to add a point (up to 12); right-click a point or press Delete to remove it; + adds one from the keyboard.
- Exact values: every handle has a field beside it. Type a number and press Enter (Esc puts it back).
- A warning appears when the setting already sits at the end the route pushes towards, for example “Brightness is at its maximum: the bass can't move it further that way”. Lower the setting, or turn the range round with Invert.
- Every change is one undo step, named after what it did (“Change the attack of the bass on scale”).
6Colours, switches, choices
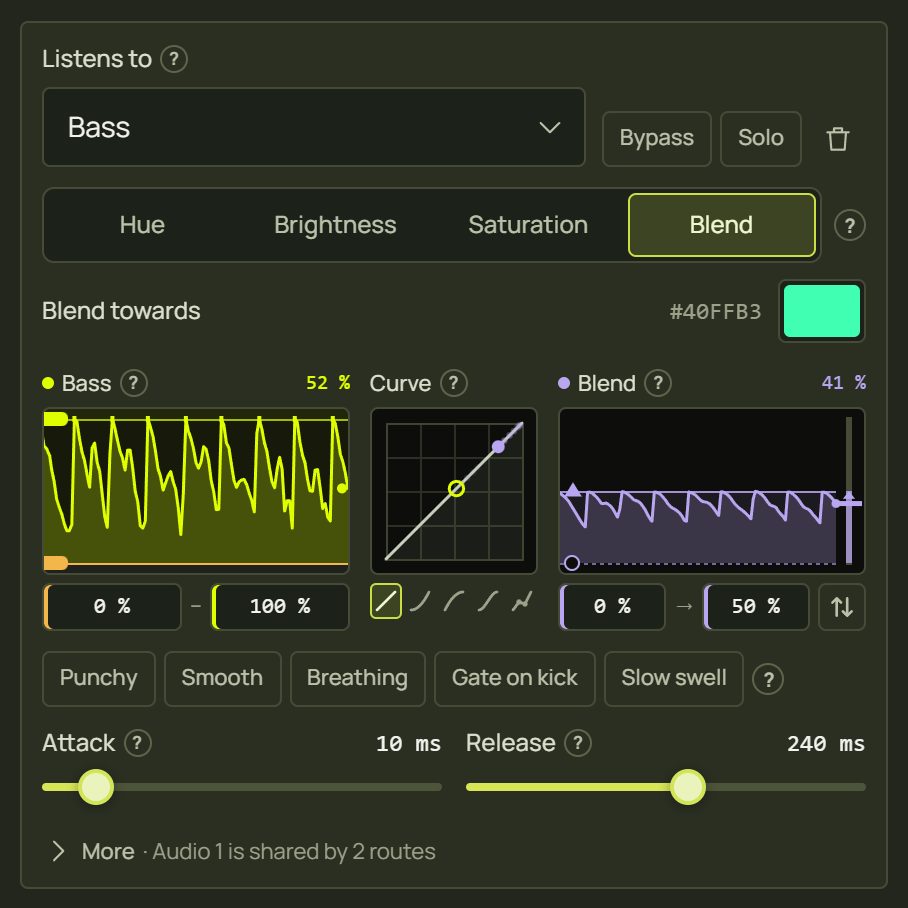
Numbers simply move. Other kinds of setting have a mode just above the Response block:
| Setting | Modes |
|---|---|
| A colour | Hue (turns round the colour wheel), Brightness, Saturation, or Blend towards a second colour (Blend towards). A grey has no hue to turn: use Blend. |
| A switch | On while above: flips while the source is above Flips at (Invert flips while quiet instead). Flip on each beat: once per LFO cycle, beat or bar, or each time the source rises past the threshold. |
| A choice | Sweep through: the source sweeps through the options. Next on each beat: the next option once per cycle, beat or hit (Next or Previous). |
| A position | X and Y, X only or Y only. |
7Smooth speeds
Every look has a Playback speed (0 to 4×, 1.00× by default) under its settings. Automating it changes the pace smoothly: the animation carries on from where it is, only faster or slower. Most looks' own Speed settings work the same way.
- A speed that can't be changed smoothly (a few rate settings) warns in its popover: Moving this speed makes the animation jump. Click Move Playback speed instead.
- Restart on cue, under Playback speed, makes every scene or cue that shows this layer play its animation from the start: one-shot wipes, “goo starts dripping”.
8Live control ▸ Automation
The Automation tab lists everything that moves a setting, grouped by surface ▸ layer ▸ setting.
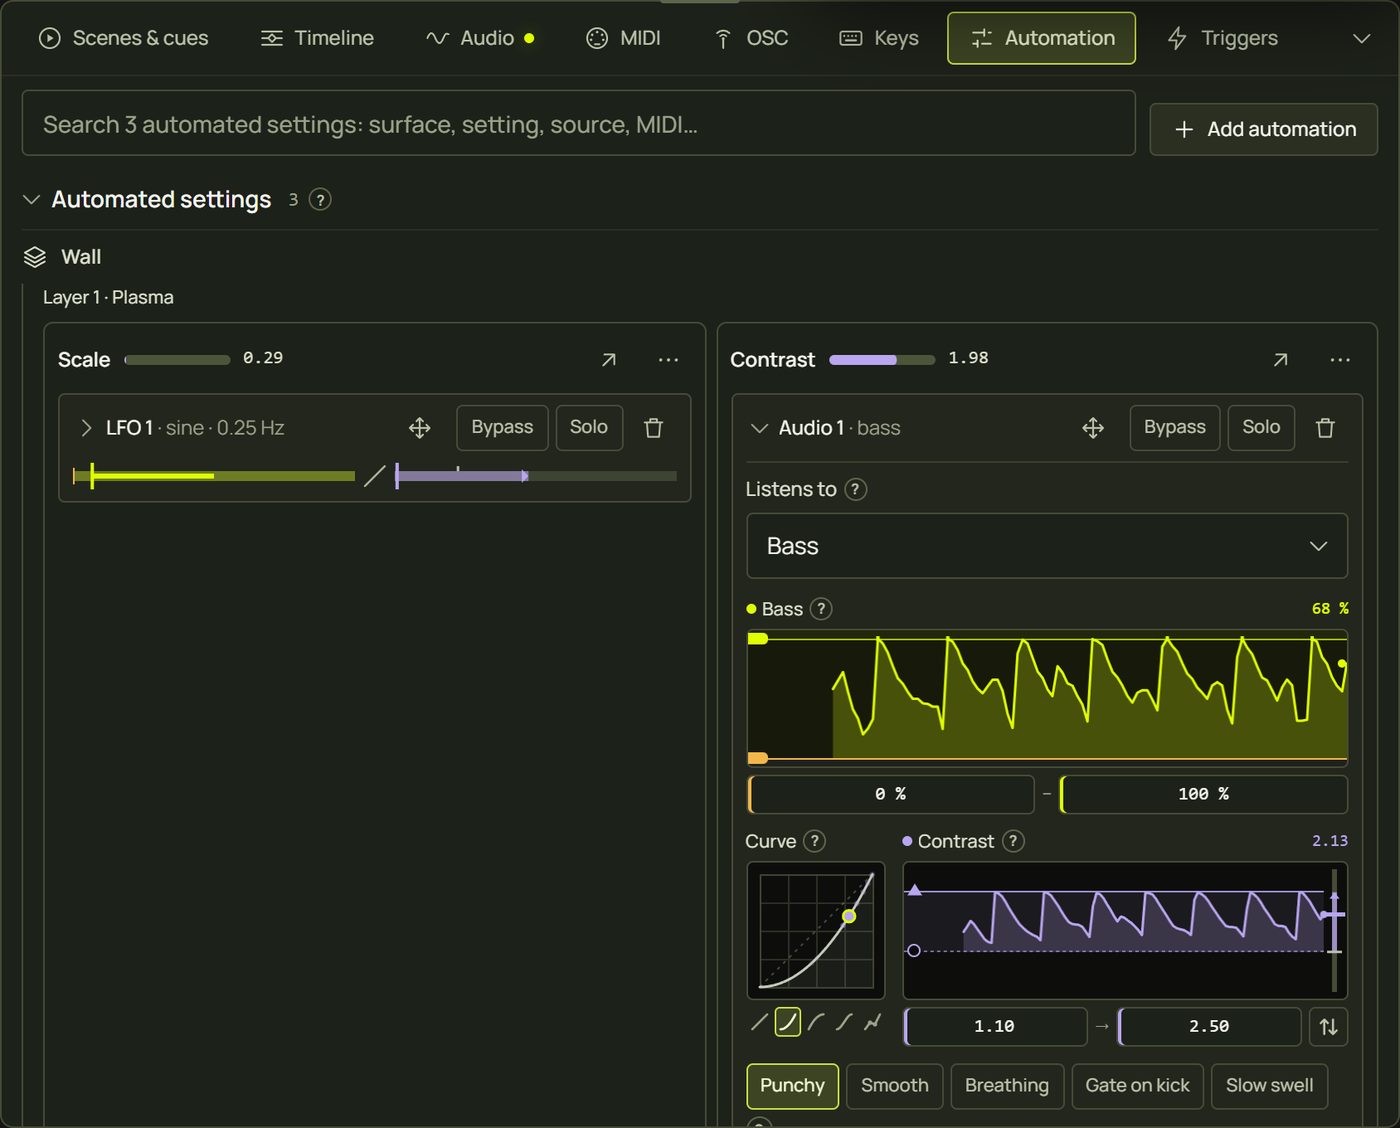
- Each setting shows what the projector gets now (a bar, a colour chip, an on/off dot), ↗ to show it in the inspector, and ⋯ for its right-click menu.
- Each route is one line with a small picture of its response. Click its name to open the full editor; the move icon sends it to another setting; Bypass, Solo and the bin work as in the popover.
- MIDI and OSC controls and triggers that set the setting are listed with it.
- Search finds surfaces, settings, sources and inputs. Show in Live control in a setting's menu narrows the tab to that setting (Show all goes back).
- Sources: + LFO, + Audio, + Ramp, + Random, and a card per source with how many settings it moves. Deleting a source deletes its routes.
9Automation in scenes and cues
A scene or cue decides what happens to the automation when it fires. Open its options (the ✎ on its tile) and find Automation in this scene:
| Choice | Firing it… |
|---|---|
| Its own (N) | sets its own automation: the routes it saved. With none saved, the button reads Take current: click it to give it the routes running now. |
| Keep | leaves the running automation alone. |
| Clear | stops the automation (for a cue: only on its own settings). |
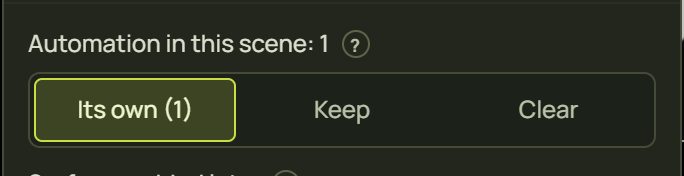
A new scene keeps the automation that runs when you save it (Its own); a new cue starts on Keep. A cue only ever touches routes on the settings it holds. See Scenes and cues.
10Hints and tips
- One source, many settings. Use Or a source you have to drive several settings from one LFO: change its rate once and everything follows.
- Phase for waves across a wall. Give surfaces the same LFO with different Phase values and the movement travels from one to the next. Or use Random per surface.
- Beat-synced beats Hz for music. An LFO in Beats follows the tempo, lands on the beat on wireless projectors, and keeps time in silence.
- Gate out the mush. Raise the input range's amber handle until only the kicks cross it: the setting moves only on the strong hits.
- Solo to find a culprit. With several routes on one setting, Solo one to see what it does alone.
- Remove it all in one go. Right-click the setting ▸ Remove automation (n) removes its routes, MIDI / OSC controls and triggers; Ctrl + Z brings them back.
11When something looks wrong
| You see | Why | Fix |
|---|---|---|
| A sound route doesn't move anything | No sound input, or the input range starts above the sound. | Start listening (top bar ▸ Sound); lower the amber handle. |
| “… is at its maximum: … can't move it further that way” | The setting sits at the end the route pushes towards. | Lower the setting, or press Invert. |
| Turning the hue changes nothing | The colour is grey, black or white: it has no hue. | Use Blend, or pick a real colour. |
| The animation jumps when its speed moves | That rate can't change smoothly. | Move Playback speed instead. |
| It flickers | Attack and release are at once, or the input range is very narrow. | Try Smooth, or lengthen the release. |
| A route vanished after firing a scene | The scene is set to Clear or has its own automation. | Set the scene to Keep, or Take current (section 9). |
| No wave buttons | You're in Simple mode. | Switch to Advanced in the top bar. |
| The Randomize trigger changes nothing | It rolls new values for random sources; without any, nothing changes. | Add a Random per surface or random LFO source first. |
12Mouse and keyboard
| Action | How |
|---|---|
| A setting's menu | Right-click · press and hold · Shift + F10 or the Menu key on a focused control |
| Close the popover | Esc (a “?” tip closes first) or click outside |
| Response handles | Focus one: ↑ ↓ step · Shift + arrows or PgUp PgDn ten steps · Home End the ends |
| Curve | Arrows pick Linear, Ease in, Ease out, S, Custom · on a point: arrows move it (Shift: further) · Delete removes it · double-click adds one |
| Fields | Enter sets · Esc reverts · ↑ ↓ step (Shift ×10) |
| Undo | Ctrl + Z: every edit, drag or preset is one step. Delete inside the editor never deletes the selected surface. |