MIDI, OSC, keys and triggers
Run your show from a MIDI controller, a tablet with TouchOSC, QLab or Ableton, or the keyboard. Faders and knobs move settings; pads, keys, beats and drum hits fire triggers: GO, a scene, a flash, a blackout, a new colour. Everything here lives in Design ▸ Live control.
1Controls and triggers
- A control (a knob, a fader, the velocity of a key, an OSC fader) sets a setting directly: the fader's bottom is the setting's lowest value, its top the highest. Unlike automation, it doesn't add to the value: it is the value.
- A trigger is something that happens: a pad or key pressed, an OSC button, a key on the keyboard, the Tap button, every beat or bar, a kick or snare hit. It runs an action: GO, a scene or cue, flash, blackout, or a setting (set it, step it, flip it, a random colour).
2MIDI
- Plug the controller in, then open Live control ▸ MIDI.
- Click Turn on MIDI and allow MIDI when the browser asks, next to the address bar. MIDI works in Chrome and Edge.
- MIDI is on: choose the controller under Listen to, or keep All devices. Move something: Last message shows what arrives, for example CC 16 = 85 · ch 1, so you know it's connected.
- Pads and keys: under Buttons and pads, click Learn a button and press the pad. It becomes a trigger that starts as GO (next cue); change its Do as in Triggers.
- Knobs and faders: under Knobs and faders, click Learn a knob or fader and move it. Choose what it Moves: Projector brightness or a surface, then its Layer and Setting.

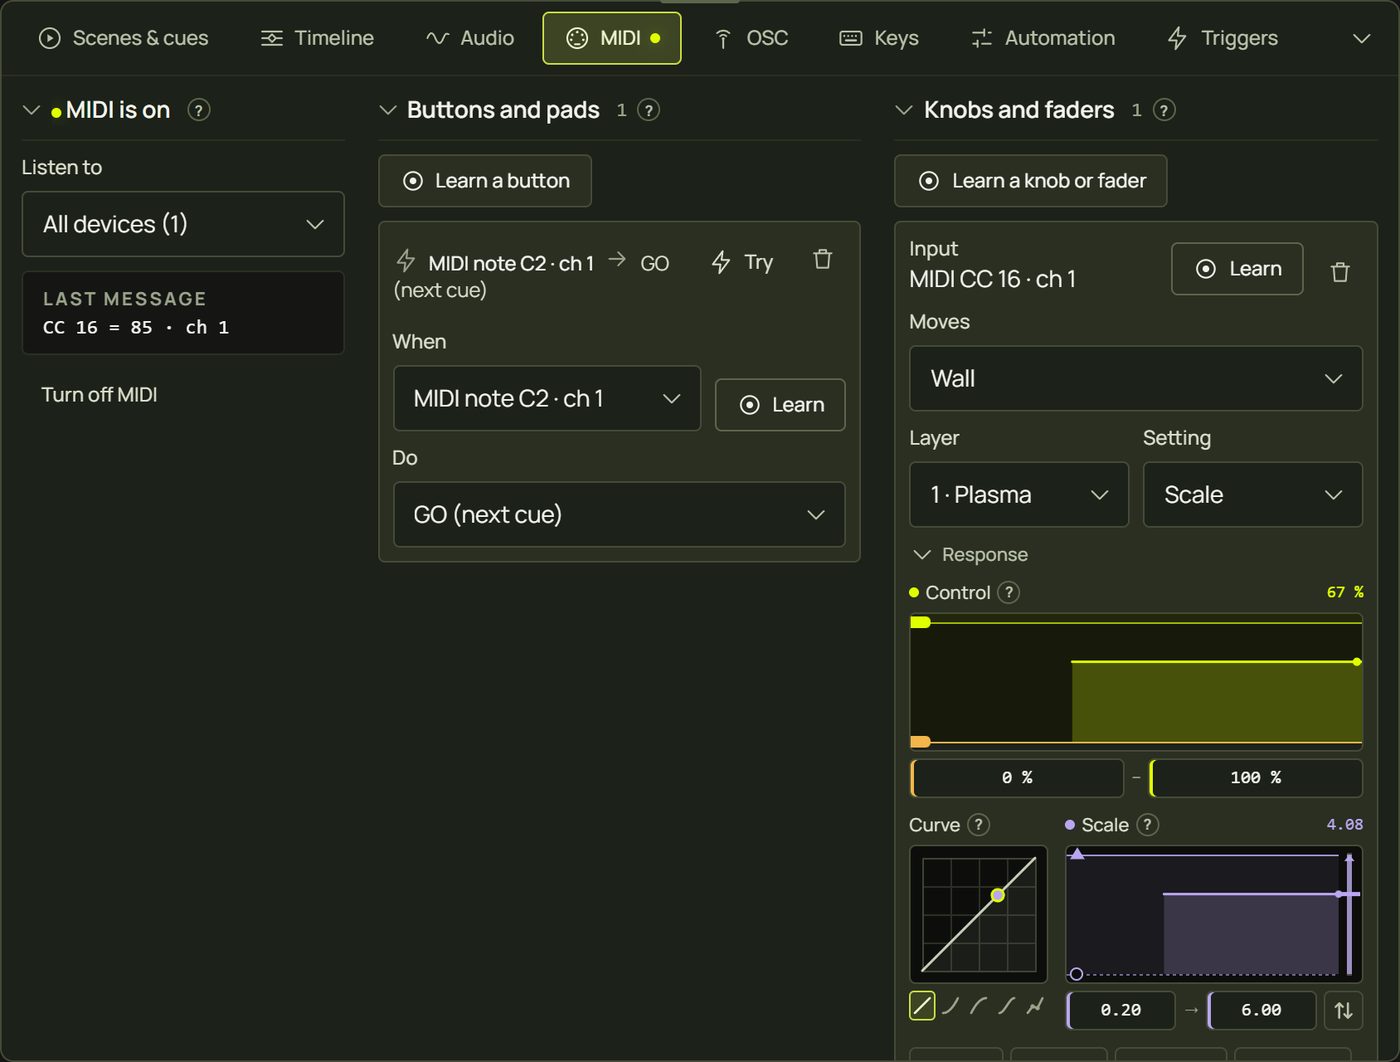
- Notes fire their trigger, and their velocity can drive a control. CCs drive controls, and fire a trigger when they cross the middle (64) upwards, which is what buttons that send 127 and 0 do. Program changes fire triggers. Pitch bend is a control.
- The browser remembers that MIDI was on and which device you chose; next time it reconnects without asking. Your controls and triggers are saved with the project.
- MIDI clock: to follow a DAW's tempo, choose MIDI clock as the tempo source in Live control ▸ Audio ▸ Beat settings. See Beat settings.
3Learn from a setting
The quickest way to link a knob to a setting is from the setting itself.
- Right-click the setting in the look panel or the inspector ▸ MIDI / OSC learn.
- A message waits: “Move a MIDI knob, fader or pad, or send OSC, for speed…”. Turn the knob.
- It confirms: “Speed now follows MIDI CC 17 · ch 1.” Its range is the setting's whole range, and its kind (hue, on/off…) suits the setting.
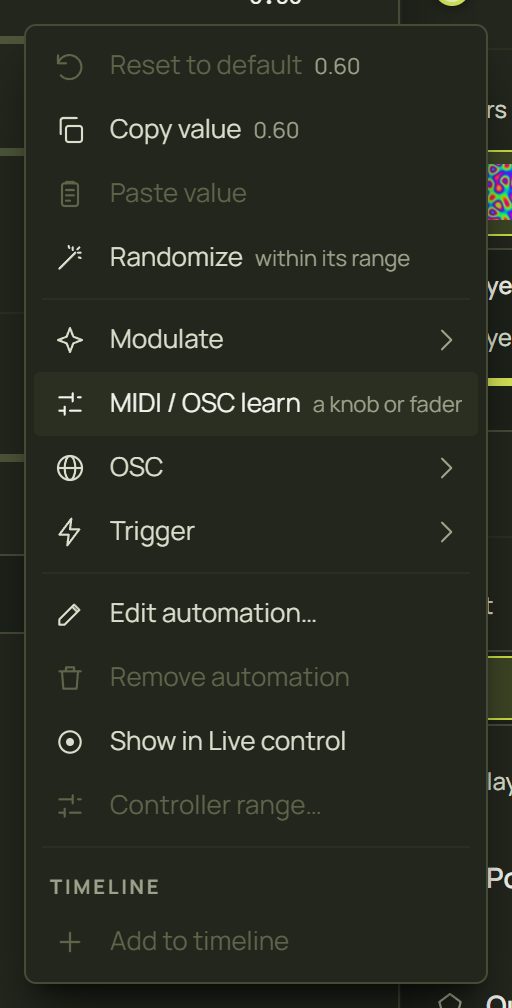
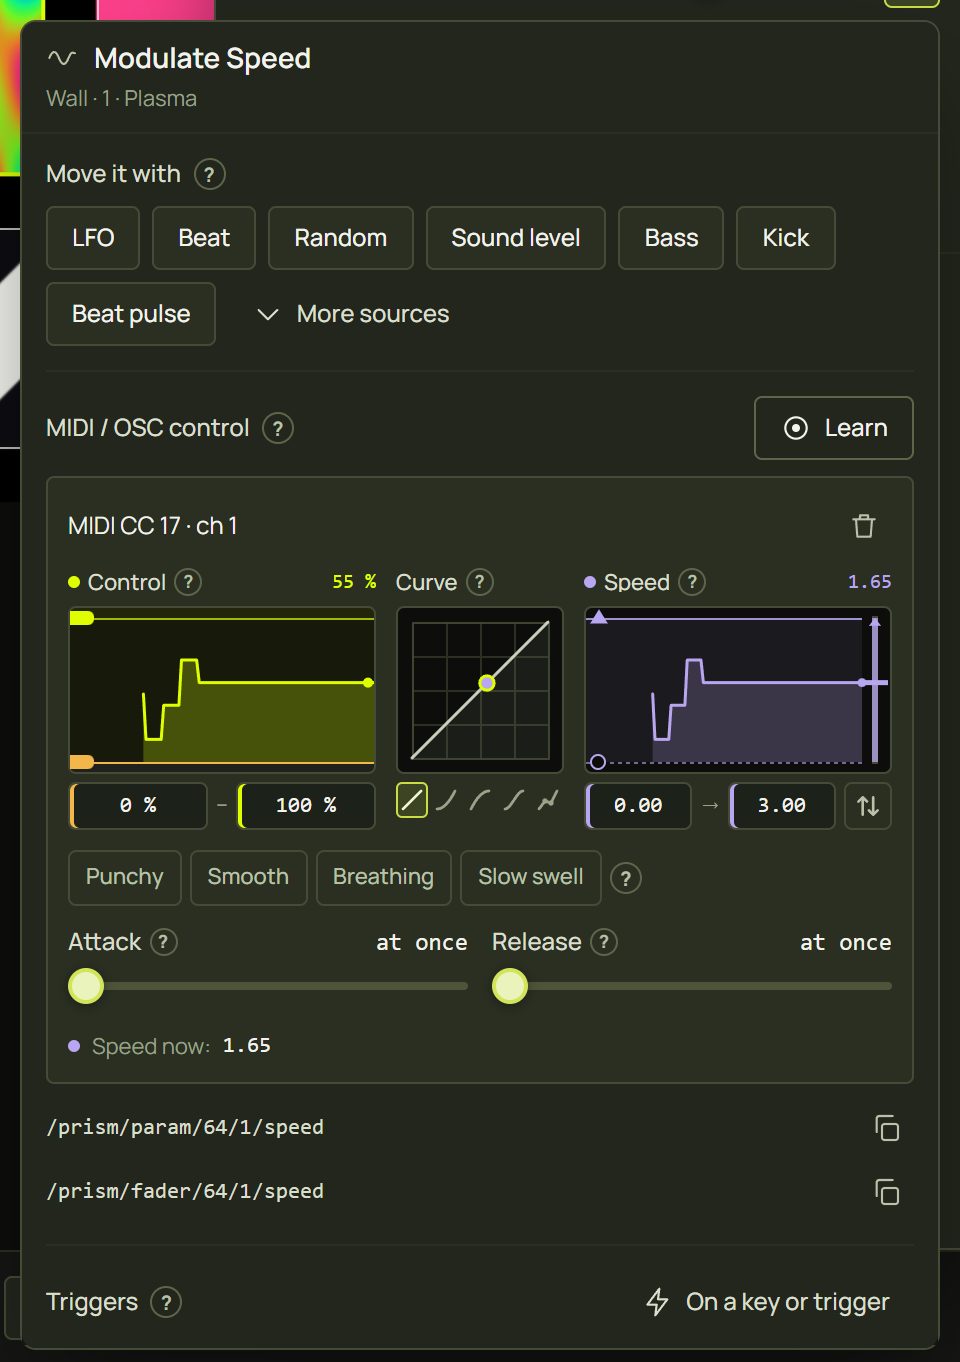
Learning the same knob again for the setting replaces its old link; a different knob adds a second control. Learn gives up by itself after 20 seconds.
4A control's range and response
Every control has the same Response block as automation (see Automation): the part of the knob that counts, a curve, and where the setting goes at the bottom and the top. Drag the ends past each other, or press Invert, to turn it round. Attack and Release make a jump glide. Open it from the control's Response line in the MIDI and OSC tabs, from the setting's wave button, or with right-click ▸ Controller range….
| Setting | How a control sets it |
|---|---|
| A number | Across its range, from the output's “from” to its “to”. |
| A colour | Hue, Brightness, Saturation, or Blend between two colours (From, To). |
| A switch | On while held, or Flip on each press; On at is the point where it switches. |
| A choice | It sweeps through the options across the control's travel (there is nothing to pick). |
| A position | X and Y, X only or Y only. |
A line under each control shows the value now, for example Speed now: 1.65. Locked surfaces are left alone.
5OSC
OSC is a network protocol many show apps speak: TouchOSC on a tablet, QLab, Ableton, Resolume. The prism server listens for it on UDP port 8000 and passes each message to the studio.
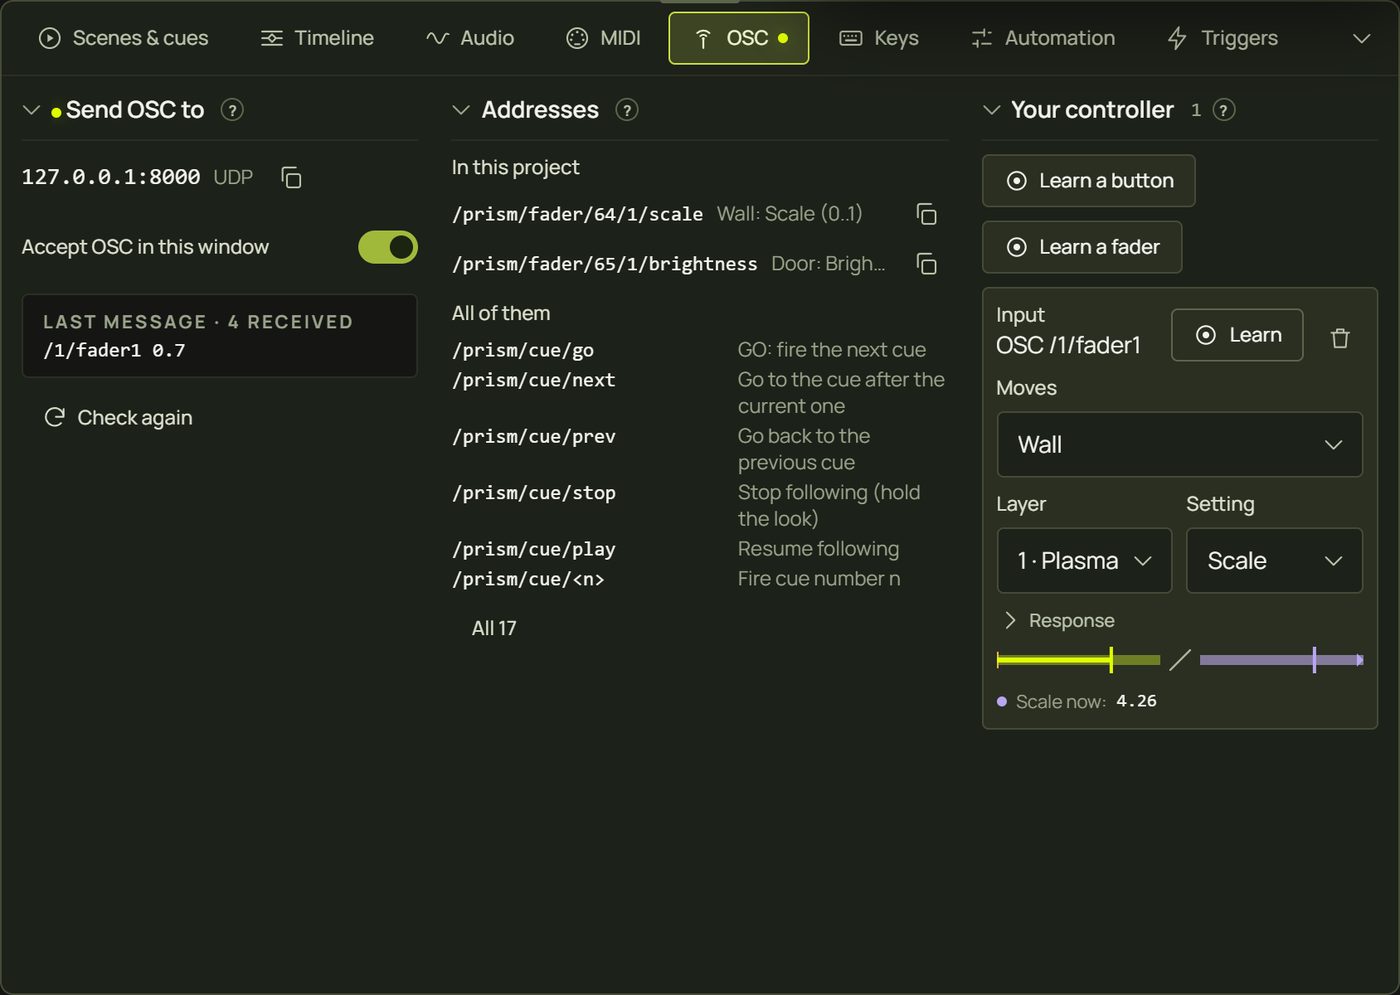
- Open Live control ▸ OSC. Send OSC to shows where to send: an address and port such as 127.0.0.1:8000 UDP (copy it with the button beside it). 127.0.0.1 means “this computer”, so apps on the same PC can reach it.
- Keep Accept OSC in this window on.
- Point your app at that address and send something: Last message shows it.
- Use prism's own addresses (next section), or learn your controller's: under Your controller, Learn a button (it starts as GO) or Learn a fader (then pick what it moves).
OSC_PORT (8000 by default).6OSC addresses
A button acts on a press: no value, a number above 0, true, or a word. The 0 a button sends when released is ignored.
| Address | Value | What it does |
|---|---|---|
/prism/ | — | GO: fire the next cue |
/prism/ | — | Go to the cue after the current one |
/prism/ | — | Go back to the previous cue |
/prism/ | — | Stop following (hold the look) |
/prism/ | — | Resume following |
/prism/ | — | Fire tile n of the GO order (the Scenes row) |
/prism/ | — | Crossfade to a scene or cue, by name or by number (counting every scene and cue in the order you made them) |
/prism/ | value | Set a setting in its own units (a colour: r g b or "#rrggbb"; a choice: number or name; a switch: 0 or 1; a position: x y) |
/prism/ | 0..1 | Set a setting across its range (a colour: its hue; a choice: across the options; a switch: on above ½) |
/prism/ | 0..1 | Projector brightness |
/prism/ | — | Blackout on / off: a press toggles it |
/prism/ | 0 | 1 | Blackout off / on (for a toggle button) |
/prism/ | — | Flash every surface white |
/prism/ | — | Re-roll random sources |
/prism/ | — | The Tap trigger |
/prism/ | — | Any trigger: key1 … key9, beat, bar… |
/prism/ | — | Tap tempo |
/prism/ | bpm | Set the tempo (20–300) |
- Surfaces by number (the OSC tab lists them under Surface numbers; hand-drawn surfaces start at 64), by name (capitals, spaces and
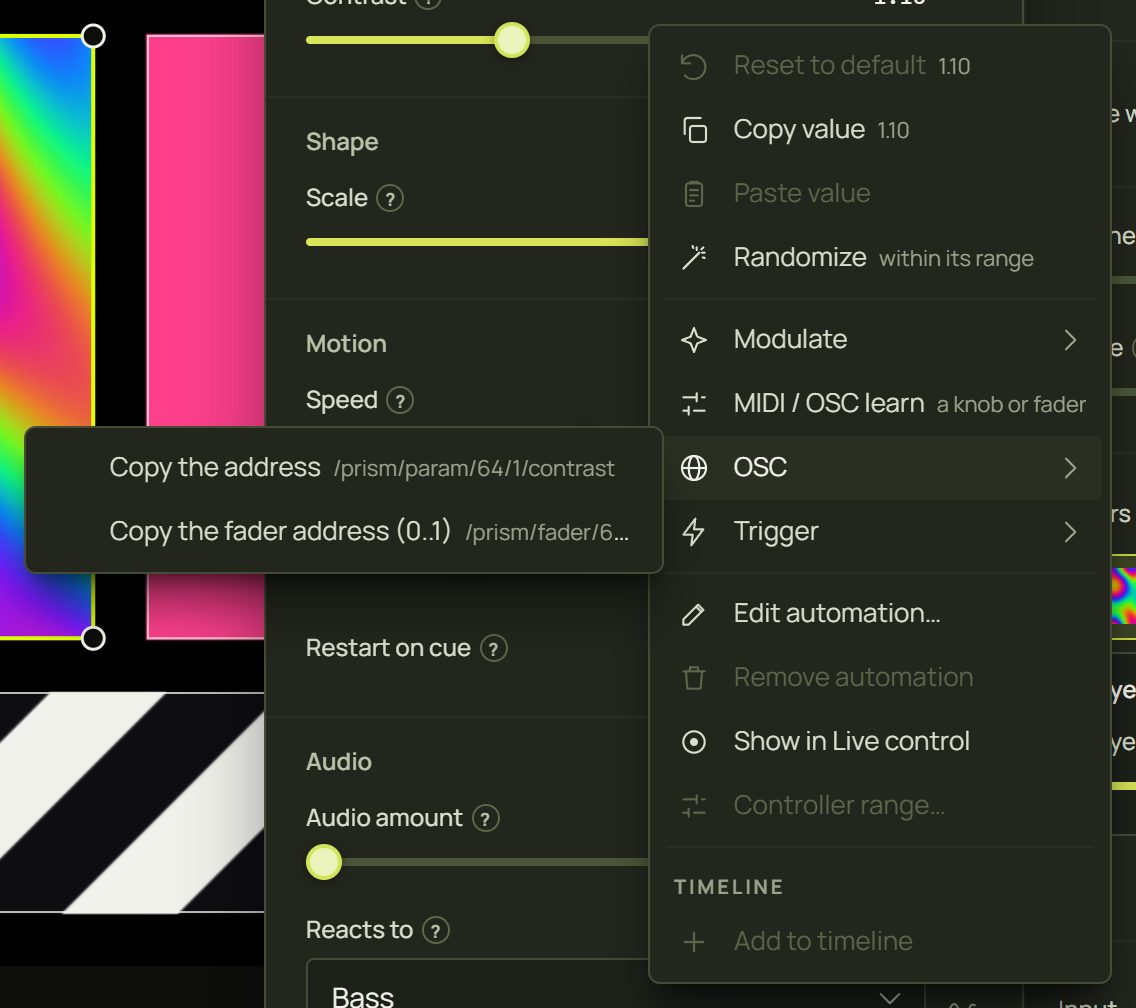
_don't matter) or*for all. Layers by number from the bottom (1 is the bottom layer) or*. Settings by their name;@opacityand@speedare the layer's opacity and playback speed. - You don't need to work them out: right-click a setting ▸ OSC ▸ Copy the address or Copy the fader address (0..1), or use the copy buttons in its wave-button popover.
7Show keys
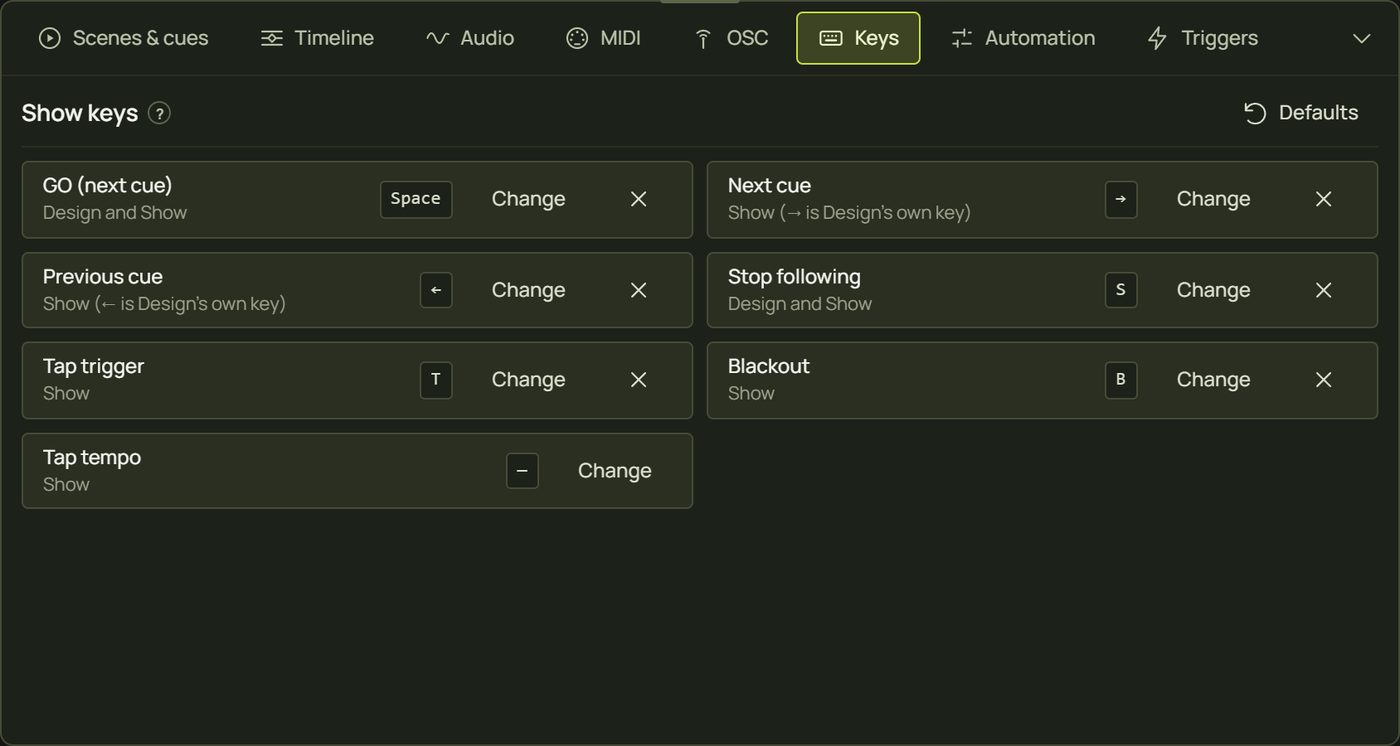
Live control ▸ Keys lists the keyboard keys that run the show. They are saved with the project.
| Action | Key | Works in |
|---|---|---|
| GO (next cue) | Space | Design and Show |
| Next cue | → | Show (→ is Design's own key) |
| Previous cue | ← | Show (← is Design's own key) |
| Stop following | S | Design and Show |
| Tap trigger | T | Show |
| Blackout | B | Show |
| Tap tempo | none | Show |
- Click Change beside the action, then press the new key (Esc cancels). Taking a key from another action moves it.
- ✕ leaves the action without a key; Defaults puts every key back.
Esc, Tab, Enter, 1–9, + and ? stay free, and so do combinations with Ctrl, Alt or ⌘. Show mode also has 1–9 (the triggers Key 1–9) and Esc (back to Design). In Show, the GO key always means GO, even with a button focused; Enter still presses buttons.
8Triggers
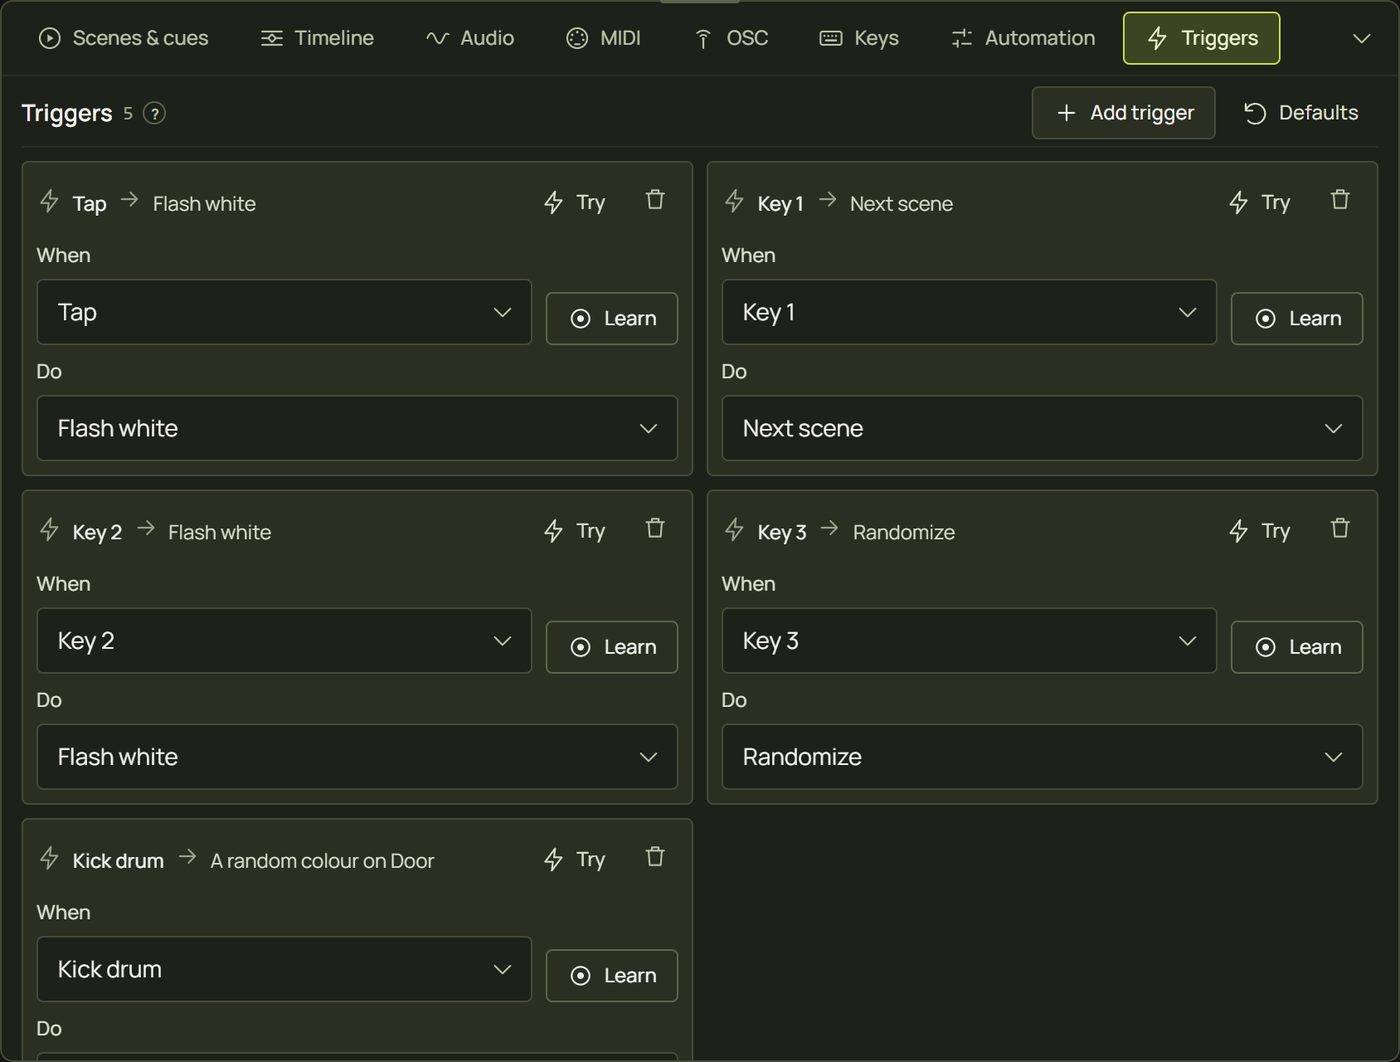
Live control ▸ Triggers lists every trigger as a card: When an input fires ▸ Do an action.
| When | Fires |
|---|---|
| Tap | The big Tap pad in Show, the T key in Show, or OSC /prism/tap. |
| Key 1 … Key 9 | The number keys and pads in Show mode. |
| Every beat, Every bar (4 beats) | The tempo clock (it keeps time without music too). |
| Audio onset, Kick drum, Snare / clap, Hi-hat | Hits in the music (needs a sound input). |
| A MIDI note, CC or program, an OSC address | Whatever Learn catches. |
| Do | What happens |
|---|---|
| GO (next cue), Next cue, Previous cue, Stop the cue list | The same as the transport buttons (see GO, previous and next). |
| Fire a cue | A tile of the GO order. |
| Go to a scene or cue | Any scene or cue, in or out of the GO order. |
| Next scene | The next tile of the GO order, as Next cue does (scenes in the order you made them when there is no GO order). |
| Flash white | Every surface flashes white. |
| Blackout | Toggle, On or Off. |
| Randomize | New values for random sources (Random per surface, random LFOs). With none, it does nothing: its card says “Randomize (nothing random yet)”. |
| Set a setting | A setting on one surface or all of them, to a value you choose. |
| Next option / flip | A choice steps to its next option; a switch flips. |
| Random colour | A vivid colour, the same for all or A colour of its own for each surface. |
| Tap tempo | Counts as a tap on the tempo. |
- Add trigger adds a card for the first free input, set to Flash white.
- Pick When (or Learn a MIDI or OSC button), then Do; for setting actions pick On (a surface or All surfaces), the Setting and its value.
- Try runs just this trigger now. The bin removes it.
New projects start with Tap → Flash white, Key 1 → Next scene, Key 2 → Flash white and Key 3 → Randomize. Defaults… puts that list back: it asks first, because it replaces every trigger, including learned MIDI and OSC buttons (Ctrl + Z undoes it).
From a setting, or a tile
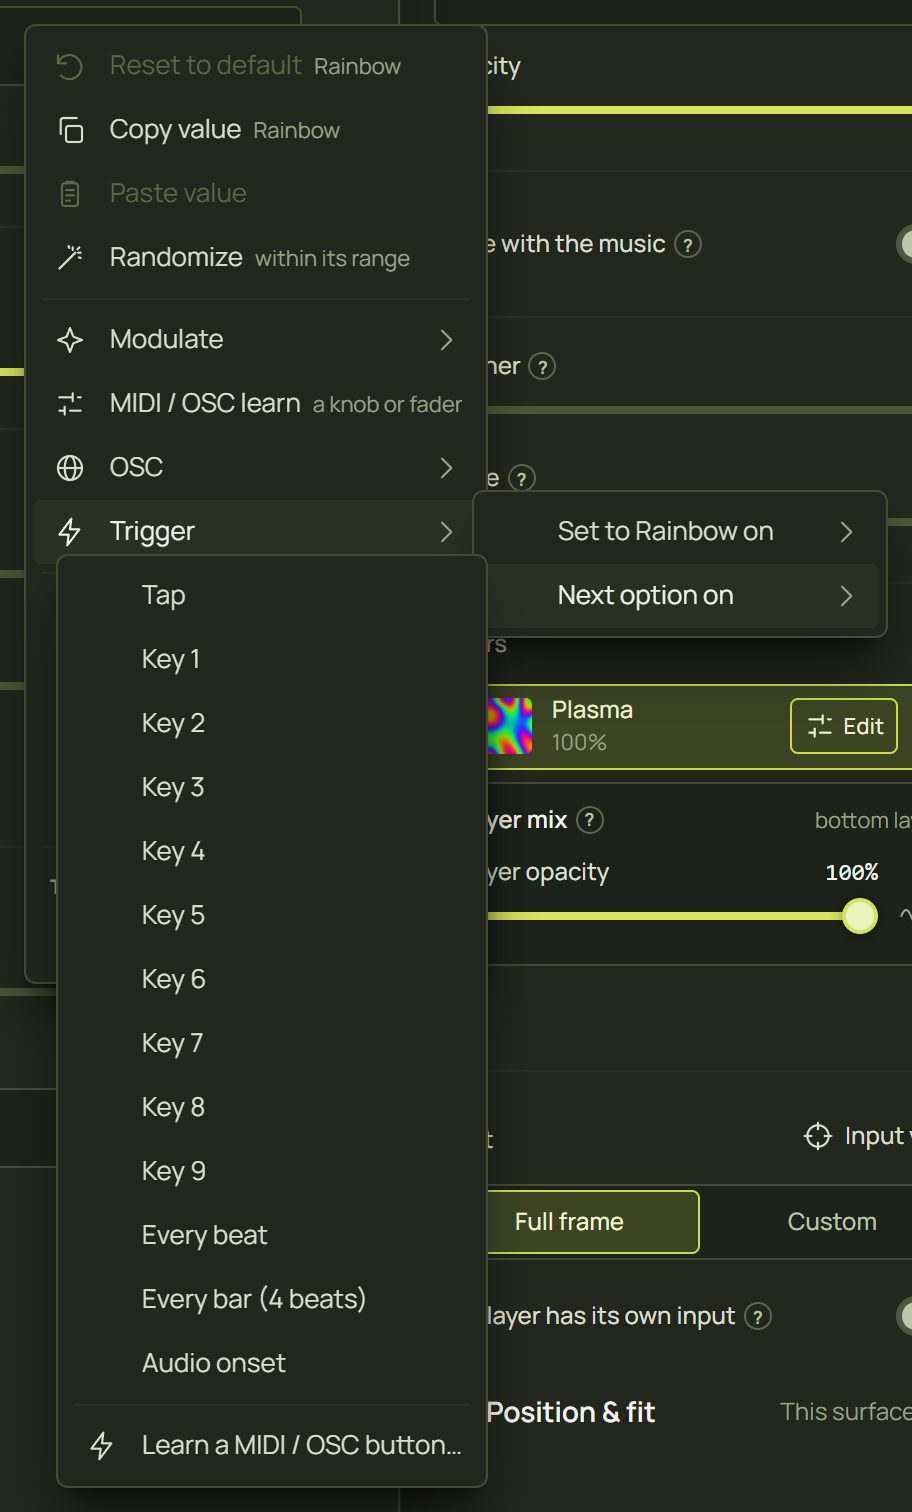
- Right-click a setting ▸ Trigger ▸ Set to … on (a switch: Turn on with or Turn off with), Next option on (a choice) or Flip with (a switch), or Random colour on (a colour) ▸ Tap, Key 1–Key 9, Every beat, Every bar (4 beats), Audio onset, or Learn a MIDI / OSC button….
- A scene's or cue's options have Triggers and keys: Learn MIDI / OSC and Add a key or trigger, so one pad fires that exact tile.
9Hints and tips
- Learn from the setting. Right-click ▸ MIDI / OSC learn is faster than picking surface, layer and setting in the MIDI tab.
- One pad per scene. In a scene's options, Learn MIDI / OSC: that pad fires that scene, whatever the GO order.
- Beat triggers for strobes. Every beat → Flash white keeps flashes on the beat (and on time on wireless projectors).
- Test with Try. Key triggers only fire in Show; Try runs a trigger anywhere.
- Label your controller. Last message shows exactly what each knob sends; note CC numbers down for your next show.
- Randomize needs something random. The default Key 3 trigger re-rolls random sources; add a Random per surface source (Automation) for it to do something.
10When something looks wrong
| You see | Why | Fix |
|---|---|---|
| “No MIDI in this browser” | Only Chrome and Edge have Web MIDI. | Use Chrome or Edge on the computer that runs the show. |
| “MIDI access was blocked” | The permission was refused. | Allow MIDI in the site settings (the icon left of the address), then Turn on MIDI. |
| “No MIDI device found” | Nothing is plugged in, or it's in use. | Plug it in (it appears by itself); close other apps that hold it. |
| Last message changes but nothing happens | The control isn't learned, or Listen to is another device. | Learn it; set Listen to to All devices. |
| A pad fires only every other press | The controller's button is in toggle mode: it sends 127, then 0 on the next press. | Set the button to momentary (127 on press, 0 on release). |
| “OSC needs the server” | The simulator has no server. | Open the project through the prism server. |
| “UDP port 8000 is already in use” | Another program listens on 8000. | Close it, or start the server with another OSC_PORT. |
| OSC arrives (Last message) but nothing moves | Accept OSC in this window is off, or the address names the wrong surface or setting. | Switch it on; copy the address from the setting's menu. |
| A tablet can't reach prism | The server listens on this computer only, or a firewall blocks UDP. | Let the server listen on the network (a trusted one) and allow UDP 8000. |
| Keys 1–9 do nothing | They fire in Show mode only. | Open Show, or use Try. |
| → and ← don't change the cue in Design | In Design the arrows nudge shapes. | Use them in Show, or give Next and Previous other keys. |
| A timeline setting stopped playing | A control took it over. | ↺ Back to the timeline in the Timeline tab. |
11Mouse and keyboard
| Action | How |
|---|---|
| Open the drawer | Live control in the strip under the canvas · drag its top edge to resize · double-click it for the default height |
| Switch tabs | ← → Home End on the tab row |
| Resize from the keyboard | Focus the edge: ↑ ↓ 16 px · PgUp PgDn 64 px · Home End |
| Fold a section | Click its title · right-click it for Collapse all / Expand all |
| Learn | Click Learn (click again to cancel), then move or press the control |
| Change a show key | Change, then the key · Esc cancels |